
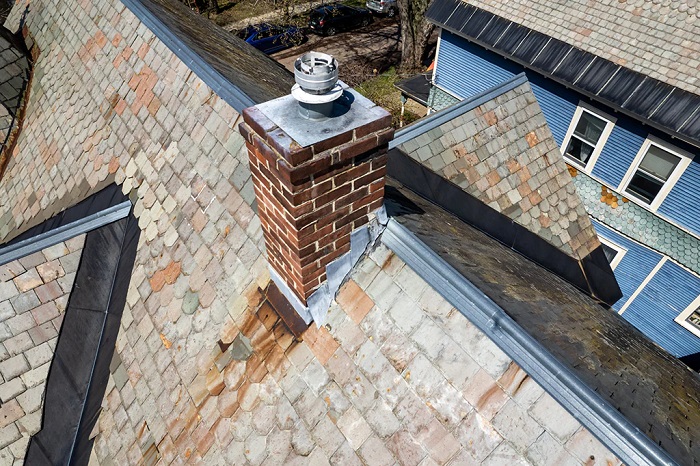
Few homeowner headaches match the frustration of a mystery water leak. You notice a faint brown ring spreading across your living room ceiling, yet the shingles directly above look pristine. A contractor climbs up, inspects the roof deck, finds no missing tabs or punctures, applies a generous dollop of clear silicone over an innocent-looking nail head, and promises the problem is solved. Two months later, a heavy storm rolls through, and the ceiling begins to drip again.
When roof leaks appear unpredictably, evade visual detection from the ground, or surface rooms away from exterior walls, the culprit is almost always the chimney flashing.
A chimney is the largest, most vulnerable penetration in your roof envelope. Bridging the gap between rigid masonry and a flexible timber structure requires precise sheet-metal engineering. When that barrier degrades or suffers from poor installation, rainwater quietly slips through the seams and travels along rafters before announcing itself inside your finished living spaces.
The Anatomy of Chimney Flashing
To understand why this junction fails so consistently, one must look at how water is directed away from a chimney. A chimney does not rely on a single piece of metal or a bead of waterproof caulk. A professional flashing installation is a coordinated, multi-component drainage system designed around gravity and overlapping layers.
The Two-Part System: Step and Counterflashing
A dependable installation utilizes two independent metal profiles that work in tandem without binding together:
-
Step Flashing: Individual L-shaped metal pieces woven directly into the shingle courses along the chimney sides. Each vertical leg rests against the brick, while the horizontal leg tucks beneath the overlapping shingle.
-
Counterflashing (Cap Flashing): Metal pieces suspended above the step flashing. The top edge is physically embedded into the brick mortar joints or an etched horizontal groove known as a reglet, while the bottom edge hangs down to overlap the step flashing by several inches.
Because these two layers are not mechanically joined to one another, the chimney and the roof frame can move independently without tearing the metal or breaking watertight seals.
Apron Flashing and the Cricket
At the chimney base, a broad, single-piece apron flashing overlaps the lower shingles to shed water harmlessly down the roof plane.
Behind the chimney, on the uphill roof slope, sits another critical component: the cricket (or saddle). This small, ridged pyramid structure splits approaching runoff and channels it around both sides of the chimney. Without a cricket, any chimney wider than thirty inches functions as a dam, trapping fallen leaves, collecting snowbanks, and pooling water directly against vulnerable flashing seams.
Why Chimney Flashing Fails Before the Rest of Your Roof
Most premium architectural shingles carry warranties spanning twenty-five to thirty years. Chimney flashing rarely reaches that milestone without maintenance or complete replacement. Several physical forces make flashing uniquely susceptible to premature failure.
Differential Movement
Your house and your chimney are entirely different structural entities. Your roof framing is made of dimensional lumber that swells with summer humidity, shrinks during dry winter months, and deflects slightly under wind or snow loads. Your chimney, conversely, is a dense column of brick, stone, and mortar anchored deep into the foundation.
When contractors make the fatal mistake of nailing counterflashing directly to both the masonry and the wood framing, structural movement tears the metal seams open or pulls fasteners straight out of the mortar.
The “Roofing Tar” Trap
The most common cause of flashing failure is the misuse of asphalt mastic, roofing cement, or hardware-store silicone.
Unscrupulous or inexperienced installers often bypass cutting a proper reglet into the mortar joint. Instead, they press flat sheet metal against the brick and smear a band of black roofing tar across the top edge. While this creates a temporary waterproof seal, asphalt mastic is exceptionally vulnerable to ultraviolet radiation and thermal expansion. Within three to five seasons, the tar dries out, forms alligator cracks, and separates from the porous masonry. Worse, the hardened tar creates a miniature shelf that catches water and directs it behind the metal, rotting the roof deck out of sight.
Hidden Corrosion and Galvanic Breakdown
Flashing fabricated from cheap galvanized steel will inevitably succumb to rust, particularly in shaded roof planes or coastal environments where moisture lingers. Furthermore, pairing incompatible metals—such as driving steel nails through copper flashing—triggers galvanic corrosion, a rapid electrochemical reaction that eats clean holes through the sheet metal around fastener penetrations.
Tracing the Clues: How to Confirm a Flashing Leak
Chimney leaks earned their reputation as “mystery leaks” because water rarely drops straight down. Water follows path-of-least-resistance physics: gravity, capillary action, and surface tension.
Moisture entering through an open counterflashing seam will often run down the vertical chimney chase, hit a sloped rafter, track ten feet horizontally along the wood, and finally pool above an electrical fixture in an adjacent bedroom.
To determine whether your chimney flashing has failed, look for these telltale indicators:
-
Attic Rafter Stains: Head into the attic on a dry day with a high-lumen flashlight. Check the plywood decking and rafters directly flanking the chimney stack for dark water tracks or white efflorescence marks.
-
Musty Smells After Driving Rain: Leaks that appear strictly during high-wind events usually point to water being forced upward under loosely bent step flashing or into failing mortar joints.
-
Flaking Firebox Mortar: If you notice dampness, rusted damper plates, or white chalky dust on the firebrick inside your fireplace hearth, water is finding its way between the exterior masonry and the flue liner.
The Right Way to Repair Failed Chimney Flashing
Surface-level patches are temporary measures designed to last through a single storm. If the flashing around your chimney has pulled away from the masonry, rusted through, or become encrusted in layers of cracked tar, the only lasting solution is a complete mechanical rebuild.
A proper repair begins by stripping the area down to bare wood. The contractor must inspect the underlying decking for rot, install a self-adhering high-temperature ice-and-water membrane tight against the masonry corners, and weave fresh, heavy-gauge aluminum or copper step flashing into new shingle courses.
For the counterflashing, the installer should use a masonry saw to cut a clean, continuous horizontal reglet at least one inch deep into the mortar joints. The counterflashing is then bent to hook directly into the groove, mechanically secured with lead wedges, and sealed using a commercial-grade polyurethane or polyether masonry sealant. This mechanical interlock ensures that even if the exterior sealant joint degrades after a decade of sun exposure, gravity will continue to direct runoff over the exterior metal rather than down the house walls.
A home’s roof is only as durable as its intersections. Investing in professionally fabricated sheet metal and proper reglet installation costs substantially less than repairing waterlogged attic trusses, ruined drywall, and structural rot caused by years of slow, concealed leakage.


